
Compass Star: a sixteen-point compass rose filling the full panel
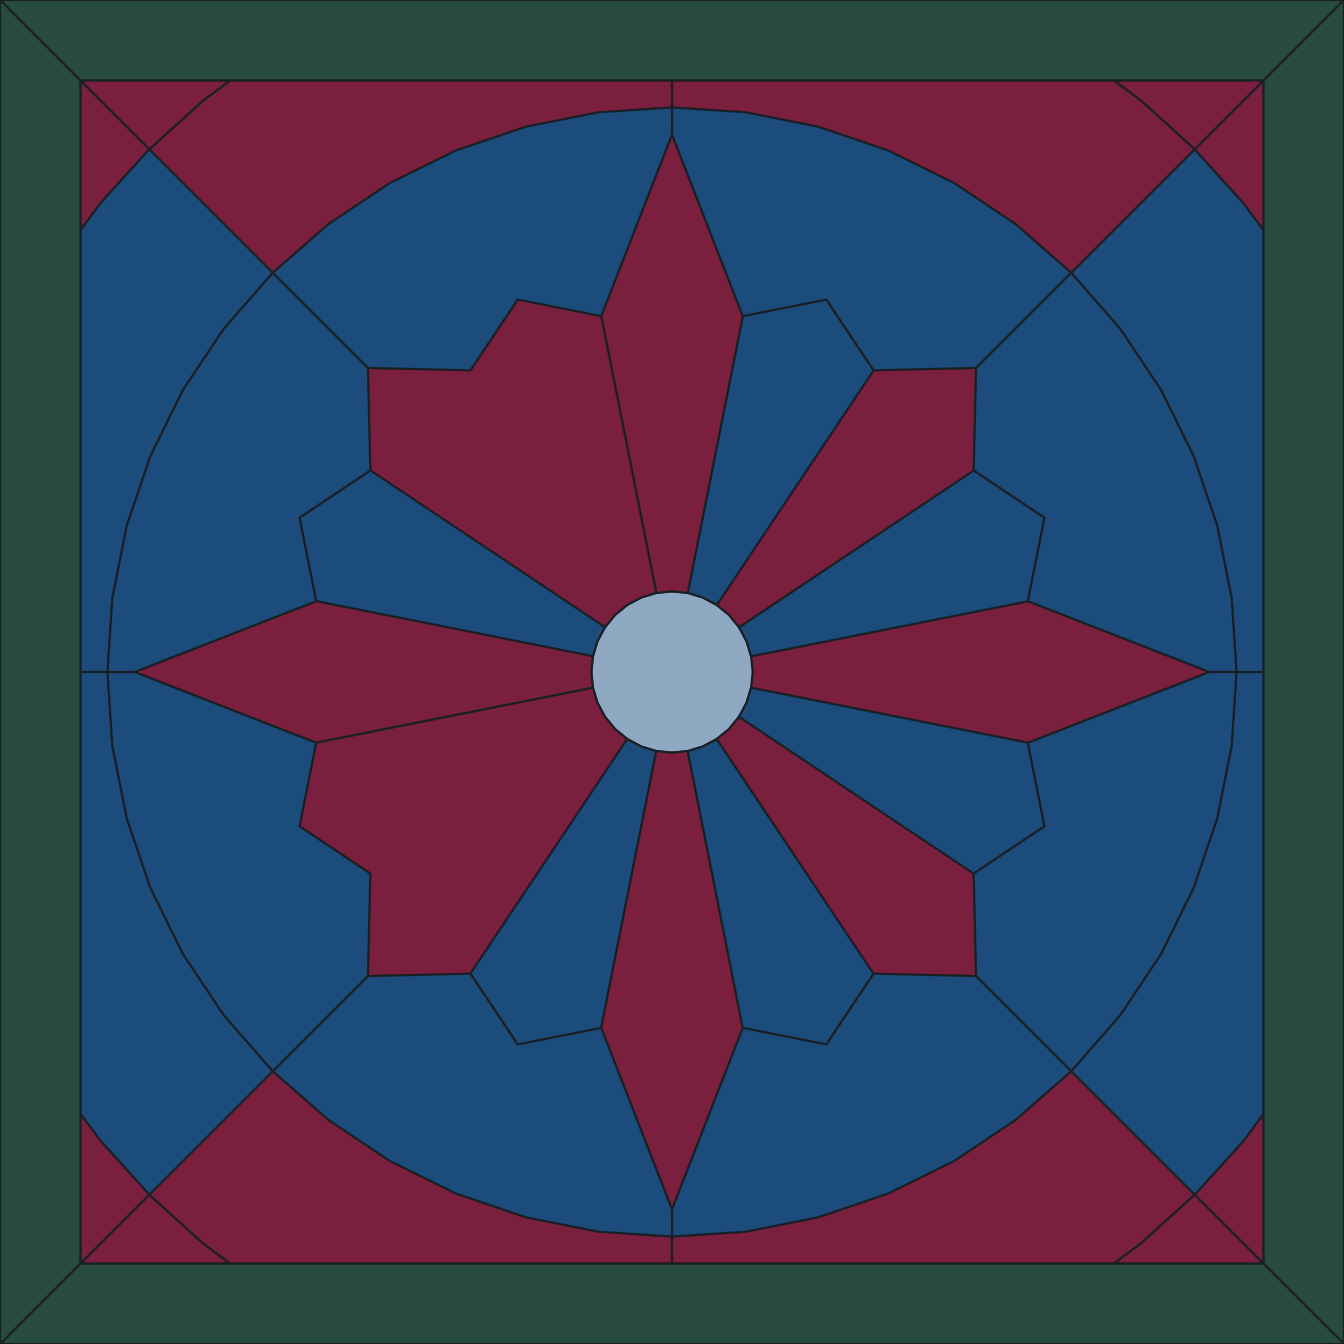
Compass Star fills the whole panel with a sixteen-point mariner's compass rose: four long cardinal points reaching the panel's edge midpoints, four medium ordinal points reaching the corners, and eight short half-wind points filling the gaps between them, all sharing one inner waist ring around a small hub disc. Forty-three pieces total, with a ring of background sectors between the star's tips and the border.
Panel size runs from 12 in to 24 in. Each point is cut as a wide triangle from the waist ring out to its own tip rather than a thin needle, which is why this pattern is rated intermediate: fitting sixteen points to a shared center takes more careful layout than the beginner patterns, even though every individual cut still clears the same minimum width and angle checks.
The download includes a full-size tiled outline, a numbered piece map, a color reference sheet, a cutting-margin pattern, and a glass and supply list.
Sixteen points, one waist ring
Every point on this rose shares the inner waist ring, which makes that ring the reference for the whole panel. Cut and fit the ring pieces first and check them as a closed circle before cutting a single point. If the ring is true, the points can only be as wrong as their own scores; if the ring is out, every point inherits it.
Where the checks bite on this pattern
A sixteen point rose is the pattern where the minimum interior angle matters most: the half-wind points are the narrowest shapes in the collection, and they are what sets the lower end of the declared size range. At a small panel width those points would be unworkable slivers, which is exactly the situation the geometric check exists to prevent.
Glass choices
A compass rose needs three values, not two: a strong dark for the cardinal points, a mid tone for the ordinals, and a quieter ground behind the half-winds. Using two values forces the eye to read sixteen identical spikes; using three gives the rose its hierarchy and makes the cardinal directions readable across a room.
Buying the glass
The glass list in the download gives square inches per color for the size you chose. Buy more than that: between offcuts, a score that runs off line and the occasional piece that breaks on the grinder, most cutters add 20 to 25 percent, and more when a color has strong directional streaking that has to run the same way across several pieces. Glass from a second sheet rarely matches the first, so buying short is the expensive mistake.
Working order from printout to final fit
Print the tiled outline at 100 percent and measure the printed scale box before taping the sheets. A 1 percent print error is 1/8 in on a 12 in panel and almost 1/4 in on a 24 in panel, enough to move the hub off center after grinding. Tape the drawing to a flat board, cover it with clear film, and mark the vertical and horizontal centerlines beyond the border so they remain visible while pieces cover the drawing.
Cut a clean template set for the hub, the waist ring, and one example of each point length. Keep the paper pattern for glass cutting separate from the assembly drawing. If you use foil, leave the normal foil allowance on the cutting pattern and do not trim the assembly drawing, since the drawing is the final size reference.
Fit the center outward. First fit the hub and waist ring as a dry assembly. Next fit the four long points on the north, south, east, and west axes. Then add the four corner points. Fit the eight short points last, because they use the spaces left between the larger points. After each group, check that opposite tips land on the same straight line. A small error at the hub can become a visible 1/16 in shift at the border.
- Use a fine permanent marker for reference lines, not a wide felt tip that can add 1/32 in of uncertainty.
- Grind in short sessions and return the piece to the drawing after every two or three passes.
- Keep paired pieces together, since opposite points should match in length, shoulder width, and angle.
- Number the back of every glass piece before washing, especially the background sectors, which can look similar after cutting.
Equipment, setup dimensions, and tolerances
A standard glass cutter, running pliers, grozing pliers, grinder, layout board, straightedge, circle or arc guide, and push pins are enough for the job. The important setup item is not a special tool, it is a stable center mark. Drive a small pin through the exact center of the drawing into the board, then use that point to confirm the hub, ring, and opposing tips before cutting the outer background pieces.
For a square panel between 12 in and 24 in, useful shop tolerances are tighter near the center than at the border. Aim for gaps near the hub that stay close to 1/32 in. At the outside ring, a local gap up to about 1/16 in is usually easier to absorb because the surrounding border and background sectors give more visual room. Do not let error collect in one quadrant. Divide corrections across several pieces.
| Panel size | Center tolerance to aim for | Outer tip check | Practical note |
|---|---|---|---|
| 12 in | About 1/32 in | Within 1/32 in of the axis line | Small errors show quickly because the short points are compact. |
| 16 in | About 1/32 in | Within 1/16 in of the axis line | This is a comfortable size for most intermediate cutters. |
| 20 in | About 1/32 in to 1/16 in | Within 1/16 in of the axis line | Longer point edges need straight scoring and even grinding. |
| 24 in | About 1/16 in | Within 1/16 in to 3/32 in | Use a large, flat board so the taped pattern cannot bow. |
Frequent mistakes and recovery methods
If the waist ring closes but is not round, do not force the points to hide it. Mark the tight areas, remove the ring, and correct the inside and outside arcs a little at a time. A ring that is 1/16 in narrow on one side will pull several points inward and make the rose look twisted.
If a point tip breaks short, compare it with the same point on the opposite side before recutting. A missing corner smaller than the foil width may disappear after wrapping, but a shortened point changes the compass rhythm. Recut the piece when the loss changes the visible outline or moves the tip away from its axis.
If the background sectors no longer fit after the star is complete, check whether the star has grown outward during grinding. Do not grind the border to chase every sector. Instead, adjust the sector edges that meet the point sides, then keep the outside border line fixed. The outside of the panel must remain square or the finished piece will be harder to frame.
If color placement feels unbalanced, fix it before soldering. Lay all pieces on the drawing under normal room light and rotate streaky glass so the flow is consistent across opposite points. For broader guidance on allowances and pattern handling, use the FAQ before cutting replacement pieces.
Special cases: texture, mirror symmetry, and scaling
Textured glass changes the fitting process. Cut with the smooth side up when possible, but assemble with the intended face up so the texture direction can be checked. Heavy texture at the hub can make tight center joints look crowded, so reserve the roughest sheets for larger point or background pieces rather than the smallest ring segments.
If the design is being used in a door, cabinet, or room divider where both sides are seen, keep left and right symmetry strict. Directional glass that looks correct from the front may reverse its visual weight from the back. Dry assemble the full rose and view it from both sides before foiling.
When scaling within the stated size range, do not judge the pattern by outside size alone. The limiting areas are the short points and the shared center. At the low end, work slowly and accept more recuts. At the high end, the main risk becomes long score control and keeping the taped pattern flat. Recheck the centerlines several times during the job, not only at the start.
Read next
- About Glass Cut Patterns: About Glass Cut Patterns: original vector-built stained glass patterns run through automated cuttability checks at every size, made by WEABLE SAS.
- Crescent Moon: a full moon panel for your first ground curve: Crescent Moon: a two-arc crescent in a banded night sky with diamond stars, a beginner pattern with one ground curve, sized 10 to 24 in, 25 pieces.
- Diamond Lattice: a framed lattice panel for straight-cut practice: Diamond Lattice: a double-bordered checkerboard of diagonal diamonds, straight cuts only, sized 8 to 24 in, 32 pieces, with a full glass list.