
Sunrise Fan: a radial sunrise panel over a banded horizon
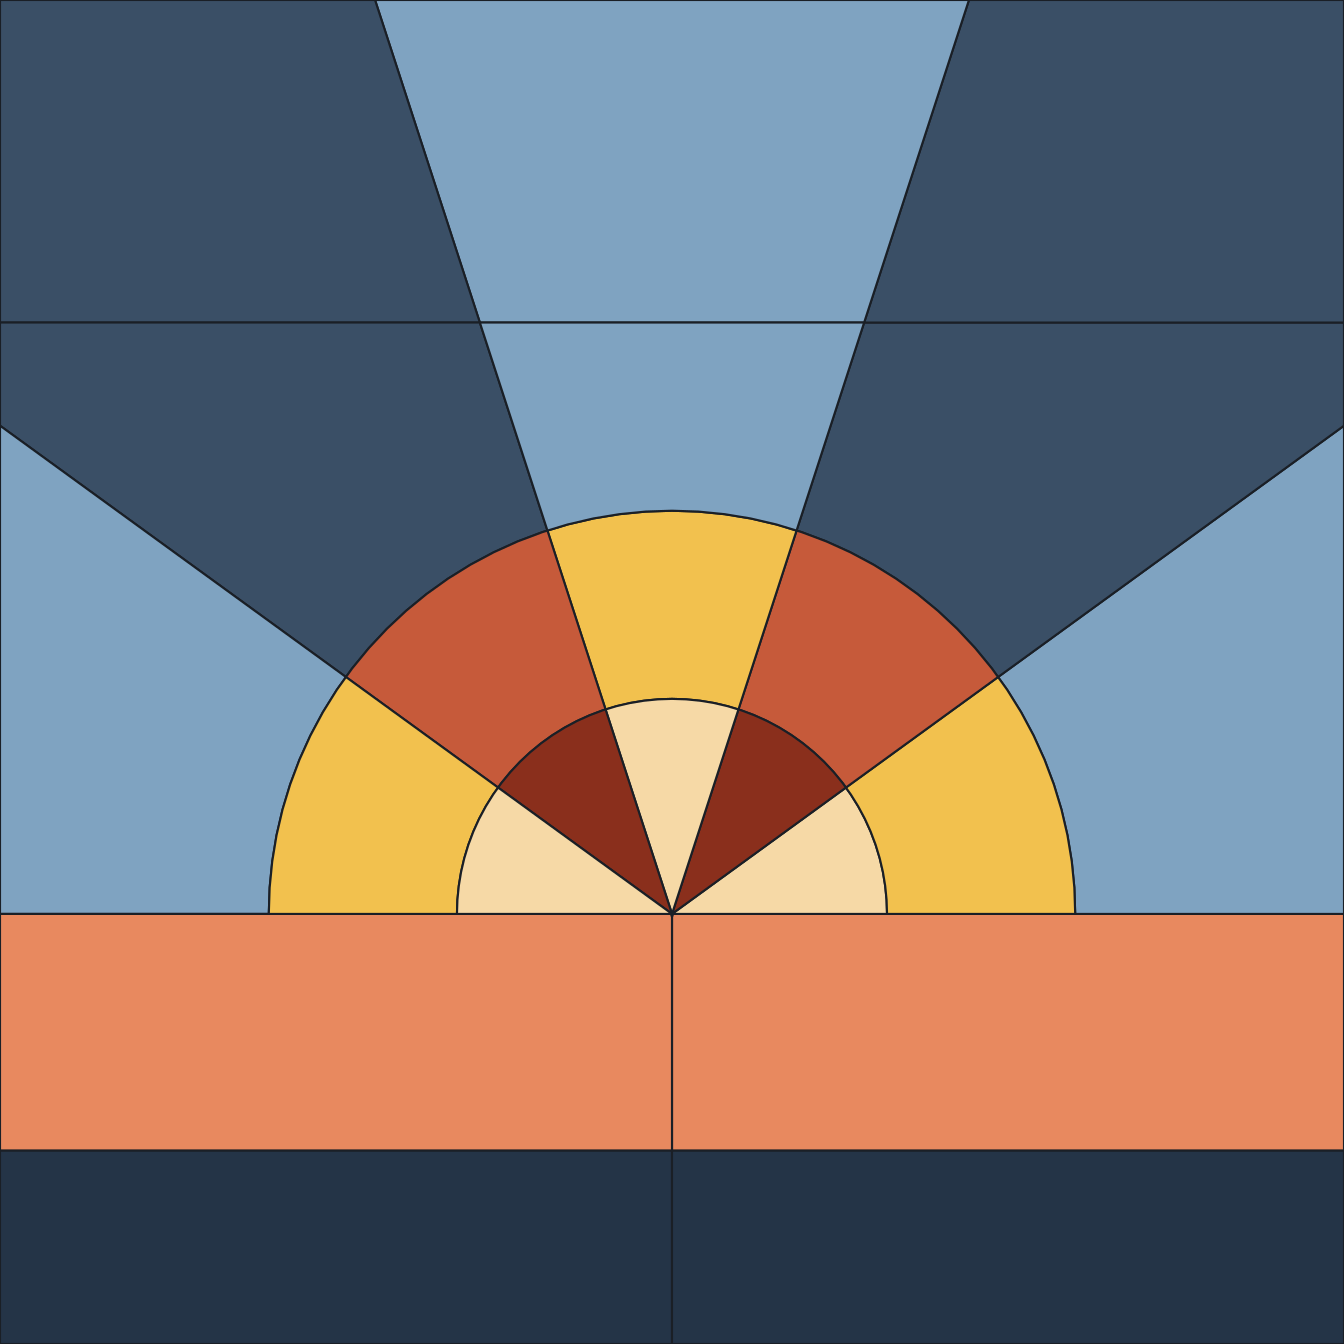
Sunrise Fan sets a five-ray sunrise disc over a banded sky and ground: full-height columns split the sky beside the disc and the ground below into safe-sized pieces instead of leaving either as one giant piece. Every ray is cut from a single straight line out of the disc's own center point, and two concentric curved rings form the disc's rim and inner band.
Panel size runs from 8 in to 24 in. The ray wedges hold a wide angle at their base and every sky and ground piece keeps its margin at every size in range, so the pattern is rated beginner.
The download includes a full-size tiled outline, a numbered piece map, a color reference sheet, a cutting-margin pattern, and a glass and supply list for your chosen panel size and technique.
Radial cuts from one center
Every ray comes off the disc's own center point, which means the accuracy of the whole fan rests on the accuracy of that point. Mark it once on the pattern and reference every ray to it rather than to the neighbouring ray. Errors referenced to a neighbour accumulate around the fan and close the last gap badly; errors referenced to the center stay independent.
Why the sky is split into columns
A single large sky piece is both expensive to replace when it breaks and awkward to cut cleanly. Splitting it into full height columns keeps every piece inside a size that scores and breaks reliably, and it gives the panel a vertical rhythm behind the disc. The same reasoning splits the ground band below.
Glass choices
A sunrise reads through value, not just color: rays lighter than the sky they sit against, with the sky darkening away from the disc. Streaky cathedral glass works well for the bands if you keep the streaks running the same way across the panel, which is a decision to make before cutting, not after.
Buying the glass
The glass list in the download gives square inches per color for the size you chose. Buy more than that: between offcuts, a score that runs off line and the occasional piece that breaks on the grinder, most cutters add 20 to 25 percent, and more when a color has strong directional streaking that has to run the same way across several pieces. Glass from a second sheet rarely matches the first, so buying short is the expensive mistake.
Bench setup, tools, and working dimensions
Print the tiled pattern at 100 percent and check it with a ruler before taping sheets together. A 1 percent print error makes a 24 in panel about 1/4 in wrong, which is enough to spoil a frame fit. Tape the pattern to a flat board, then cover the working copy with clear film if you use the copper foil method, or with a second sacrificial copy if you cut directly over paper.
- Use a glass cutter with fresh oil, running pliers, grozing pliers, a grinder with a dressed bit, pattern shears matched to the technique, a fine marker, a ruler at least 12 in long, and push pins or layout blocks.
- Keep a 1/16 in to 3/32 in assembly gap around the outside edge if the finished panel will sit inside a rigid frame.
- For copper foil, keep the glass gap between neighboring pieces close to 1/32 in. For lead came, follow the heart width of the came you actually use and test two scrap pieces before cutting the panel.
- Plan 2 to 4 hours for cutting and grinding an 8 in to 12 in panel, 5 to 8 hours for a 16 in to 20 in panel, and a full day or more for a 24 in panel if the glass is streaky or textured.
Cutting and assembly procedure
Start with the pieces that prove the geometry. Cut the disc bands and the five rays first, then dry fit them on the pattern around the center. If these parts do not sit cleanly, do not continue into the sky columns yet. Correct the fan while the number of affected parts is still small.
Cut the ray pieces from the narrow point outward. Score each long radial edge in one continuous motion, then break with running pliers placed close to the score. For the curved bands, rough cut the glass 1/8 in outside the line, then score the final curve. A curve that is too tight for a clean single break can be removed as several shallow bites with grozing pliers, followed by grinding.
After the fan is dry fitted, cut the adjacent sky pieces, then the outer sky columns, then the ground band. This order keeps the most visible joins under control. Grind only to fit, not to reshape the design. A good target is that each piece drops into place without force but does not slide sideways more than about 1/32 in. Number the glass on the same face throughout so that textured or coated glass is not accidentally reversed.
| Panel size | Useful tolerance at fan center | Typical outside frame allowance | Dry fit check time |
|---|---|---|---|
| 8 in to 10 in | About 1/64 in | 1/16 in total slack | 10 to 15 minutes |
| 12 in to 16 in | About 1/32 in | 1/16 in to 3/32 in total slack | 20 to 30 minutes |
| 18 in to 24 in | Less than 1/32 in preferred | 3/32 in to 1/8 in total slack | 30 to 45 minutes |
Frequent mistakes and practical recovery
If the last ray gap is too wide or too tight, do not grind every ray edge. Find the single part that moved the error. Place the disc and rays back over the pattern, align the center point, and check each radial edge with a straightedge. Usually one ray was cut slightly off angle. Recutting that one piece gives a cleaner result than spreading the error across five joins.
If a sky column breaks across a corner, check whether the remaining shape still reaches the lead or foil line with enough glass for a clean edge. A hidden repair inside the panel is usually more visible than a new piece, especially in light sky glass. Recut the piece when the crack crosses the visible field. Save the broken piece as a grinding guide for its replacement.
If the concentric bands become flat after grinding, stop and compare them to the paper pattern. A flat spot of 1/16 in can catch the eye because the circle sits at the center of attention. Mark only the high area with a marker and grind short sections, cooling the glass every 10 to 15 seconds. Do not chase the whole ring thinner.
If the panel grows during assembly, the cause is usually excess gap between repeated vertical pieces. Pin the outside boundary first, then fit inward toward the fan. For copper foil, burnish the foil flat before final fitting. Thick, wrinkled foil can add more width than expected across many seams.
Special cases: small panels, large panels, and directional glass
On an 8 in panel, the smallest ray tips and band segments leave little room for heavy texture. Choose glass that scores predictably and avoid deep ripples near the center. A small grinder bit helps, but the better fix is accurate scoring before grinding.
On a 24 in panel, weight and flex matter during soldering or cementing. Keep the work flat, rotate the board instead of lifting the loose panel, and do not carry it until both faces are structurally tied. If the finished piece will hang rather than sit in a sash, plan the hanging system before assembly, not after the border is closed.
Directional glass needs a cutting map. Draw arrows on the pattern pieces before any glass is cut, especially in the sky columns and ground band. If one column is rotated 90 degrees, it may look like a different color even when it came from the same sheet. For general method questions that are not specific to this pattern, see the FAQ.
Read next
- Compass Star: a sixteen-point compass rose filling the full panel: Compass Star: a sixteen-point mariner's compass rose filling the panel, cardinal and ordinal points sharing one waist ring, sized 12 to 24 in, 43 pieces.
- How to size a pattern to fit your panel opening: How to pick the right panel width for a stained glass pattern: measuring your opening, checking a pattern's size range, and rerunning checks per size.
- Tiffany Arch Fan: a half-circle dome fan over a paneled sill: Tiffany Arch Fan: a true half-circle dome fan over a paneled sill, in the traditional stained glass lampshade style, sized 10 to 24 in, 30 pieces.