
Tiffany Arch Fan: a half-circle dome fan over a paneled sill
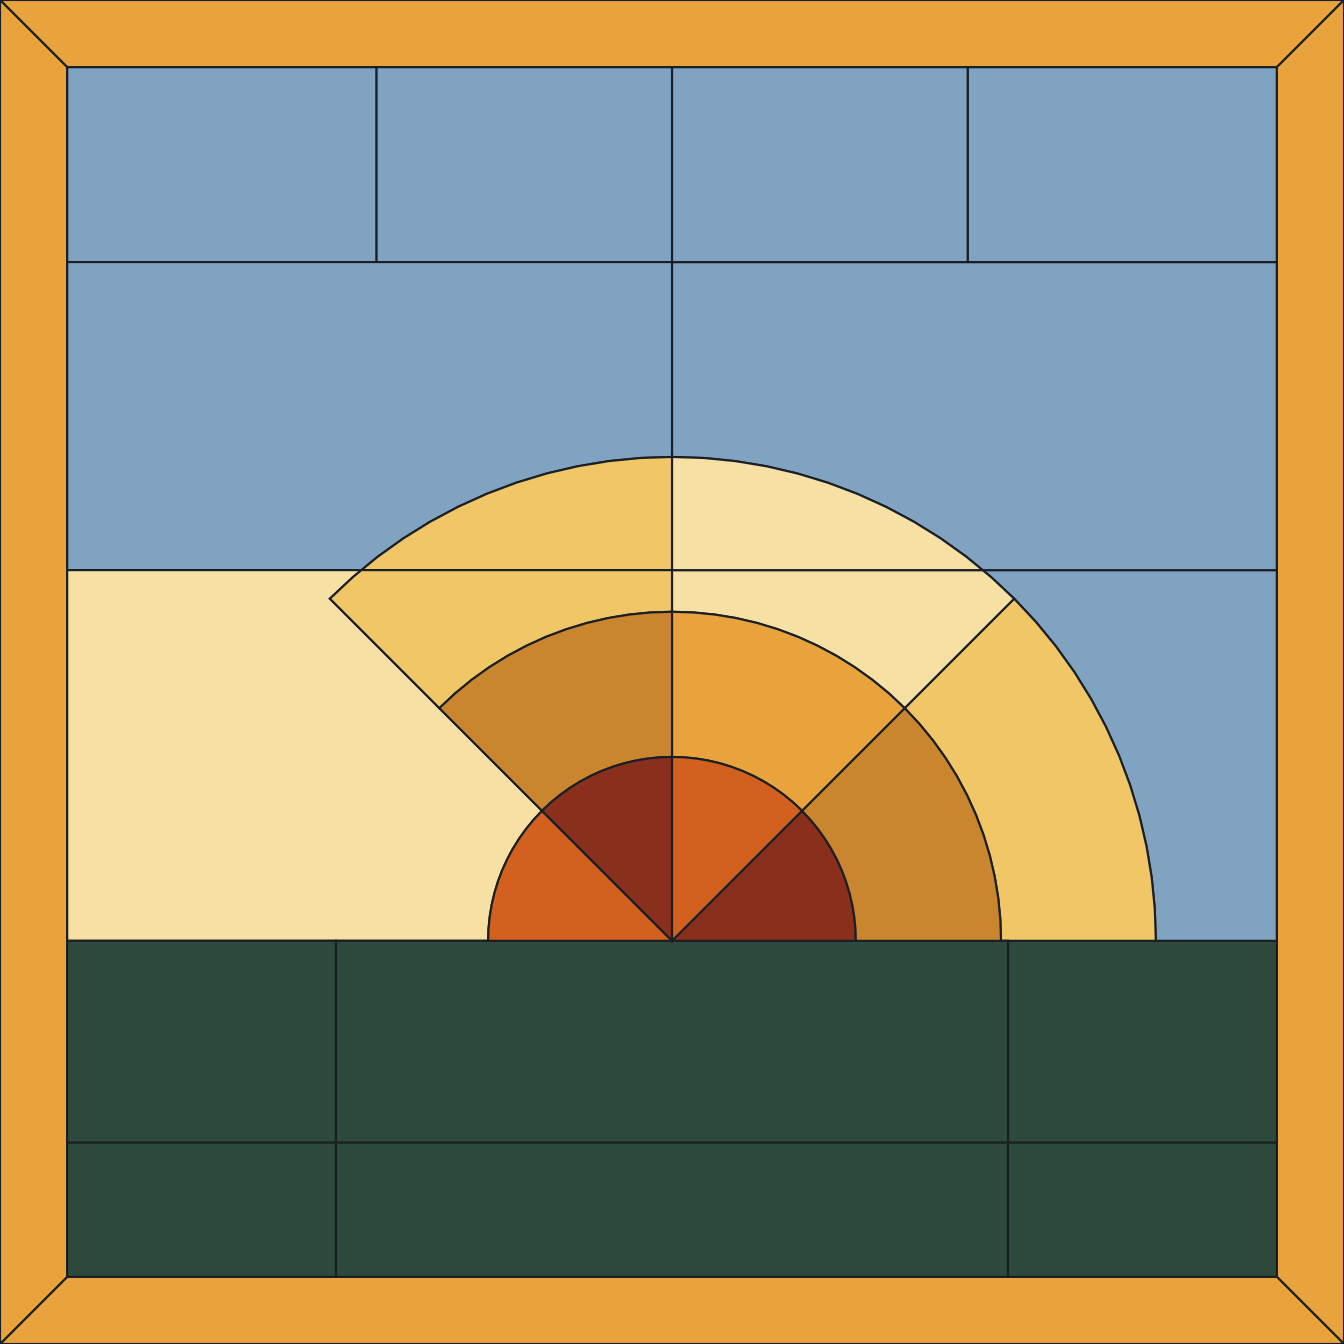
Tiffany Arch Fan sets a true half-circle dome over a sill band, in the style used on lampshade side panels. The dome is split into 3 concentric bands and 5 radial wedges (15 fan facets in the dome alone), and both the sill and the sky beside the dome are split into bands rather than left as one giant piece.
Panel size runs from 10 in to 24 in. Thirty pieces total; every wedge holds a wide angle margin at the dome's shared center point, and the dome's own curve stays above the minimum reentrant radius at every size in range.
The download includes a full-size tiled outline, a numbered piece map, a color reference sheet, a cutting-margin pattern, and a glass and supply list.
Concentric bands and radial wedges
Fifteen facets in the dome means fifteen pieces that must share two curved seams each. Work band by band from the inside out, fitting each band completely before starting the next, and dry lay the dome on the printed pattern at every stage. Accumulated error in a fan is unrecoverable at the last wedge, where it all arrives at once.
Why the sill and the sky are banded
Left as single fills, the sill band and the sky beside the dome would be large fragile pieces that cost the most to replace and are the hardest to score cleanly. Splitting them into bands keeps every piece within a reliable size and echoes the horizontal rhythm the dome already sets up.
Glass choices
This is a lampshade idiom, so opalescent glass suits it: it carries color when lit from behind and still reads as a surface in daylight, which a pure cathedral does not. Graduating the three dome bands from light at the crown to deeper at the springing line is the traditional treatment and the easiest to get right.
Buying the glass
The glass list in the download gives square inches per color for the size you chose. Buy more than that: between offcuts, a score that runs off line and the occasional piece that breaks on the grinder, most cutters add 20 to 25 percent, and more when a color has strong directional streaking that has to run the same way across several pieces. Glass from a second sheet rarely matches the first, so buying short is the expensive mistake.
Bench setup, tools, and working tolerances
Print the tiled pattern at 100 percent and check it with a ruler before cutting glass. A 1 percent printer error makes a 20 in panel wrong by 3/16 in, which is enough to move the fan center and force several wedges out of shape.
Use two pattern copies. Keep one clean as the assembly drawing, and cut the second into templates. Cover the assembly copy with clear film or a waxed overlay so flux, water, and glass dust do not soften the paper.
- Use a carbide glass cutter, running pliers, grozing pliers, a grinder with a dressed bit, foil shears or pattern shears, push pins, layout blocks, a square, and a fine permanent marker.
- Leave about 1/32 in around each glass piece for copper foil and solder. If you cut directly to the outside of the paper line, the finished panel usually grows.
- For a 10 in panel, keep grinding corrections under 1/64 in per edge. For a 24 in panel, corrections of 1/32 in are usually safe if they are spread across several seams.
- Use 7/32 in foil for most standard stained glass thicknesses. If your glass varies strongly in thickness, test one scrap joint before foiling the whole fan.
For curves, score from the narrow end toward the wider end when the shape allows it. On tight inside corners, make relief scores into the waste area rather than trying to remove the full waste piece in one break.
Cutting and assembly procedure
Start with the sill pieces and the side sky pieces, because they form the visual frame that controls the half-circle. Cut them slightly proud, dry lay them, and grind only enough to bring their outer edges back to the printed boundary.
Cut the dome pieces in matched order. Mark each template with its number, grain direction, and face side before it leaves the pattern sheet. Opalescent glass often has a better face, and flipping one wedge can make the band look uneven under light.
Dry fit the inner fan band first. Pin the shared center area, then set the two outer edges. The center must stay open enough for foil and solder, not crushed into a point. After the inner band fits, add the middle band and then the outer band. Check every curved seam against the printed line, not only against its neighbor.
Foil after all pieces fit. Burnish the foil on the face, back, and edge. If a curved seam opens wider than about 1/16 in after foiling, recut the smaller or simpler of the two pieces. Filling a wide fan seam with solder makes a dark heavy line and can pull heat into a narrow point.
Solder in short passes. Tack the center, the left and right springing points, and the main outside corners. Then solder alternating areas rather than completing one side from top to bottom. Let the panel cool flat for 5 to 10 minutes before turning it over.
Figures to check while you work
| Check | Usable figure | Why it matters |
|---|---|---|
| Printer scale check | 100 percent, with less than 1/32 in error over 10 in | A small print error changes every radial seam. |
| Foil and solder allowance | About 1/32 in between neighboring glass edges | This leaves room for foil without forcing the panel to grow. |
| Maximum open seam before recut | About 1/16 in after foiling | Wider solder lines are weak visually and harder to control. |
| Cooling pause after soldering one face | 5 to 10 minutes on a flat surface | This reduces heat warp before the panel is flipped. |
| Final outside size check | Within 1/16 in for small panels, within 1/8 in for large panels | This decides whether the panel will fit its planned opening or border. |
If the panel will be framed, check the frame rebate before soldering the outside bead heavily. A thick outer bead can add more size than expected, especially at the springing line where several seams meet.
Common mistakes, recovery, and special cases
If the last fan wedge will not fit, do not grind only that wedge until it drops in. First measure the total error across the band. If the gap is spread through five wedges, remove a small amount from several radial edges. This keeps the fan from showing one visibly thin wedge.
If the shared center becomes crowded, stop and trim the foil tails. Overlapped foil at a tight center can add thickness equal to another glass edge. Reburnish the ends flat, then retack with a small solder dot before running the full seam.
If a curved band breaks during scoring, save both pieces until the replacement is cut. The broken part is often the best guide for where the score was stressed. Move the next score 1/8 in farther from the tightest corner if the glass sheet gives you room.
Strong streaky glass needs one extra layout step. Place all dome templates on the sheet at once, with arrows aligned. Photograph the layout before cutting. If one piece breaks later, the photo helps you recut it with the same grain direction.
For very small versions, reduce grinding time and use lighter solder. Small fan pieces lose shape quickly on the grinder. For large versions, support the center while soldering so the heat and weight of the bead do not dish the panel. For more general build questions, see the FAQ.
Read next
- Ridge Line: a mountain range over a still lake: Ridge Line: front and back mountain ridges over a still lake with a two-tone reflection, sized 8 to 24 in, 44 pieces, gently sloped straight cuts only.
- Sunrise Fan: a radial sunrise panel over a banded horizon: Sunrise Fan: a five-ray sunrise disc over a banded horizon and ground, sized 8 to 24 in, with a full-size PDF and margin pattern, 22 pieces.
- Your files: Access your purchased pattern downloads here.